A photography habit

I have a habit of taking photographs of the same scene multiple times! I am not sure if there is a name for this habit or not?

I like to use the same scene to:

  • Record changes over time;
  • To try out different cameras;
  • Experiment with camera settings

The results can be quite varied…

All of those were taken from approximately the same location. It is a viewpoint about 50 metres from our home here in France.

In the distance is the town of Thouars,(Nouvelle Aquitaine) and the land in the foreground is part of ‘Le Cirque de Missé with the river Thouet winding its way around the curves and pass a small hamlet of Fertevault.

I’ve often cropped my photos from this view to create some great panoramic photos.

I have sometimes spotted a lovely sunset whilst closing our shutters, grabbed a camera and jogged down to the viewpoint in my slippers! Unfortunately our house doesn’t over look this scene, but we are close enough.

Do you ever repeat photos of the same scene?

Photography Resources

There are dozens of YouTube channels devoted to Photography, here are some of the channels that I follow.

Take a look and see if there are any that interest you.

Comparing the output of digital cameras

I wanted to do a simple experiment to compare the output of my different digital cameras.

I took approximately the same scene at about the same time on the same day. With the cameras set to approximately the same settings and similar focal length.

The images are unedited and only converted to JPG for the purposes of uploading them to this site.

So do mega-pixels count? And has camera technology changed between 2004 (EOS20D) and 2019 (Apple iPhone XR)

Canon EOS20D 8.3MP (2004)

Canon EOS 100D 18MP (2015)

Nikon D300 12MP (2009)

iPhone Xr 12MP (2018)

Canon Powershot SX120IS 10MP

I also I carried out tests on a range of old mobile phones, not as easy as it sounds these days! But I eventually managed to get the files off of the phones.

Nokia 6230i 1.3MP (2004)

Nokia 6300 2MP (2007) Phone A

Nokia 6300 2MP (2007) Phone B

Apple iPod Touch Gen 4 0.7 MP (2010)

iPhone 4 5MP (2010)

Nokia C2-00 3.2 MP (2011)

Nokia C5-00.2 5MP (2011)

Apple iPhone Xr 12MP (2018)

Using what you already have….

We seem to go through life hankering for the latest thing, the newest phone, a better car or what ever your interests might be.

As a keen amateur photographer the trend in camera gear seems to be to bring out new ‘better’ cameras every few years. Fine if you have the disposable income to replace your gear that frequently.

Last year I inherited an old Nikon D300 camera, in terms of current camera technology it’s considered to be ‘vintage’ ! It came out in the late 2000’s. It’s all of 12 MP and I was fortunate to get the manual and a lot of accessories with the camera.

For several years I’ve used Canon cameras, starting with a Canon EOS30 film camera, then the EOS20D 8MP digital SLR. More recently in 2015 I got the small EOS100D, which is the perfect light weight travel camera.

Picking up the Nikon last year, it is quite a hefty thing, in a way something I missed from using my 20D. Those two make the 100D look like a toy camera! It might seem odd, but the weight and balance helps you hold the camera steadily.

I still have the EOS30, the 20D, they were just not getting used so much.

This last year or so I’ve been looking at the new cameras that have come out wondering what I should buy. Prior to getting the Nikon D300, it would most probably have been another Canon, but having used the Nikon for the last year it has somewhat confused the decision.

However, should I even be considering buying another camera? Would I gain anything by having a new camera?

Looking around on YouTube for videos about the Nikon D300 I came across ‘One Month Two Cameras‘ a channel that specialises in using older ‘Vintage’ cameras. The channel got featured on Fstoppers yesterday as well in their article: Are Vintage Digital Cameras the Biggest New Photography Trend?

I find it funny that in the scope of digital cameras, vintage seems to be anything that came out pre-2010. In the world of Filofax vintage tends to be the early 1980’s or before, but that’s a whole new discussion!

Having watched several of the videos I started to realise that older cameras can still produce very acceptable images. Even my old Canon EOS20D with only 8MP is still very usable if you take a few precautions. Shooting in RAW, and keeping the ISO speed low. Memory card size isn’t so much of an issue these days, so don’t you have to worry about the file size so much. The Nikon D300 can take a 16 or 32 GB CF card, that gives me plenty of capacity for a weeks worth of photography easily.

With care you can extract some very good quality images from these old cameras. As long as you aren’t zooming in too far on the images or cropping them too much you will still have a very good quality image to use or print.

If you consider what we use our images on these days, Facebook and Instagram or any other social media platform they all tend to be fairly low resolution.

  • Facebook – 1,080 x 1,350 pixels
  • Instagram – 1,350 x 1,080 pixels or 1,080 x 1,080 pixels

If you need a higher mega pixel image then there are lots of software options these days that can boost the image resolution using artificial intelligence to fix issues with picture noise etc.

I tend not to edit my images that much though. I might correct the image for any tilt and may be crop out any distractions. But I don’t spend hours in Lightroom… I don’t even have it! I only use the Photos app built in to the MacOS it is good enough for what I need.

On a similar theme to using old cameras I’m still using a couple of old camera bags too. My Lowepro Orion AW shoulder bag/backpack and an even older Lowepro Mini Treker. The elastic parts have been replaced in recent years, but other than that both bags are still giving great service.

Will I be investing in a new camera any time soon…. at the moment it looks unlikely!

Always expect the unexpected – Filofax

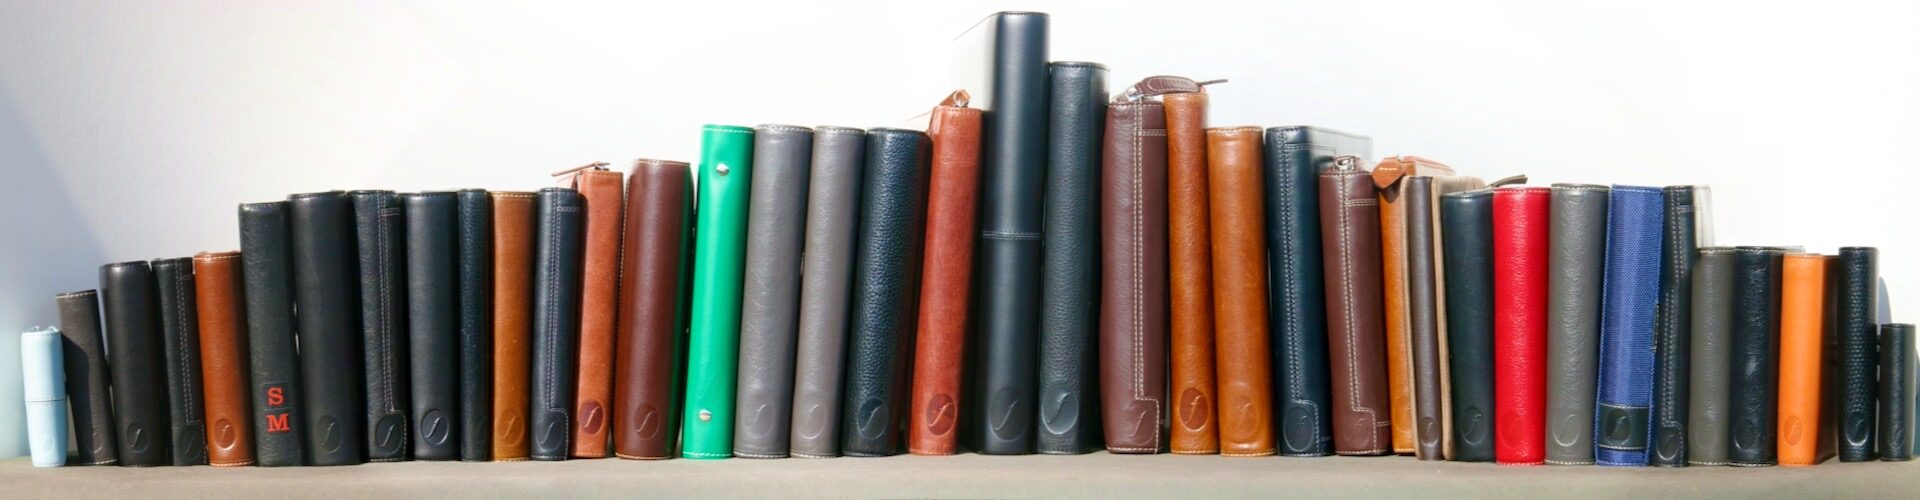
Did you ever own a Filofax or other personal organiser?
Do you still own one?

Contrary (perhaps) to popular belief, it’s still going as an effective time management and even life management tool. A super-enthusiastic community worldwide is extremely active and knowledgeable.

You may also ask how I and this blog about Romans and thrillers are connected to Filofaxes. Well, this brand new A-Z guide, available for pre-order today, was written, compiled and sweated over by my husband, Steve Morton, and published through my imprint, Pulcheria Press.

—————
Available now for pre-order:
Ebook: Kindle (Amazon worldwide)    Apple    Kobo    B&N Nook
Paperback: Amazon UK   Amazon US    Barnes & Noble
Book Depository   Waterstones
(Publication date 3 January 2022)
—————

Who is Steve?
Although he bought his first Filofax organiser in 1986, Steve moved to an electronic organiser in the 1990s. A change of job in 2005 where he worked in a high security environment prompted his return to a Filofax.

He has used one daily ever since.

Now retired from being a radio and electronics engineer, Steve now devotes his time to the Philofaxy blog website and the planner community.

Quirky fact: he featured in the highly acclaimed The Dull Men of Great Britain book published in 2019 by Random House due to his Filofax dedication.

Since 2016 Steve co-hosts a podcast, The Hitchhikers Guide to the Plannerverse, devoted to making better use of planners.

So, what could this book do for you?

Filofax is the great survivor turned indispensable cult.

  • But how do you choose the size and the inserts from so many on offer?
  • How do you select the design to work best for you?
  • How does your Filofax fit into and enhance your life?

Whether you’re thinking of getting your first Filofax organiser, have just bought it or are a long-term user, this guide will help you get the best out of it, from the basics to the clever stuff.

  • Easy A-Z format
  • In-depth review of different designs (and their quirks!)
  • Secret features users might not suspect exist
  • Timeline of Filofax’s history through the last 100 years
  • Introduction to other leading manufacturers of organisers (Gillio, Van Der Speck)

Several years of pain, fun and experience are brought together in one book which will suit both new and established users.

————

Connect with Steve and the community
Philofaxy blog: https://philofaxy.blogspot.com

Facebook:
The Philofaxy public page: www.facebook.com/Philofaxy/ 
Steve’s Philofaxy page: www.facebook.com/MrPhilofaxy/

Instagram: https://www.instagram.com/MrPhilofaxy/

Twitter: https://twitter.com/philofaxy

————

I’m very proud to be able to place my editing, formatting and publishing skills, experience and contacts behind this great reference book. I know Steve is my life partner and has been for over 35 years(!), but I think this guide is not only useful in a practical sense, but also an extremely accessible guide to take you through the world of personal organisers.

Here’s where you can pre-order it now:

Ebook: Kindle (Amazon stores worldwide)    Apple    Kobo    B&N Nook
Paperback: Amazon UK   Amazon US   Barnes &Noble  Book Depository

—————

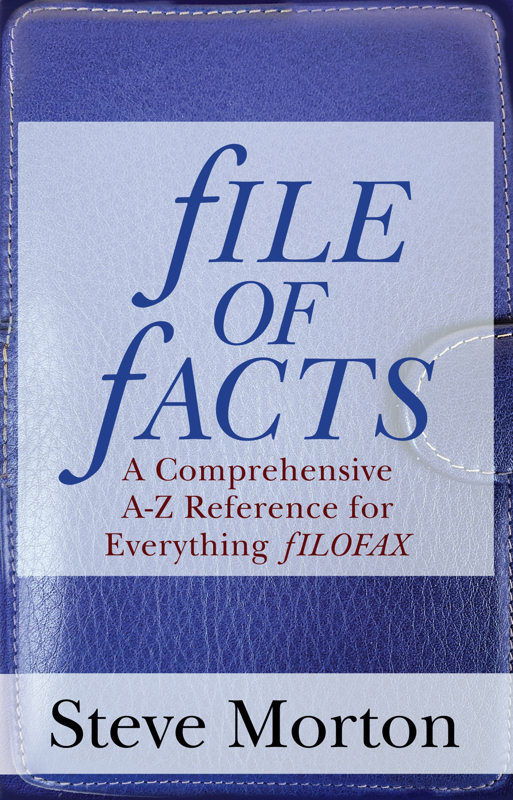
fILE OF fACTS: A Comprehensive A-Z Reference for Everything fILOFAX
Publication by Pulcheria Press 3 January 2022
Ebook: ISBN 9791097310332
Paperback: ISBN 9791097310325


Alison Morton is the author of Roma Nova thrillers –  INCEPTIO, CARINA (novella), PERFIDITAS, SUCCESSIO,  AURELIA, NEXUS (novella), INSURRECTIO  and RETALIO,  and ROMA NOVA EXTRA, a collection of short stories.  Audiobooks are available for four of the series. Double Identity, a contemporary conspiracy, starts a new series of thrillers. Double Pursuit, the sequel, is now out!

Download ‘Welcome to Alison Morton’s Thriller Worlds’, a FREE eBook, as a thank you gift when you sign up to Alison’s monthly email newsletter. You’ll also be among the first to know about news and book progress before everybody else, and take part in giveaways.

Attention Email Subscribers

Google have decided to stop their ‘Subscribe by email’ service using Feedburner. If you wish to continue to follow my blog by email, please visit the blog and resubscribe by email to the new service I have added in the side bar.

Thank you.

Using Your RSS Reader For You Tube

If you like RSS you tend to want to have all your content in one place—your RSS reader.

But if you also follow some channels on YouTube this is a problem, since Google doesn’t publish RSS feeds for channels. They want you to start and stop on YouTube, basically.

So here’s how to create an RSS feed from any YouTube channel.

Steps

  1. Go to the YouTube channel you want to track
  2. View the channel address
  3. It will look something like: https://www.youtube.com/channel/UC39ZfoNWe5zYFD1D0hTRRsQ
  4. Get the value for that element (it’ll look something like UC39ZfoNWe5zYFD1D0hTRRsQ
  5. Replace that value into this URL:
https://www.youtube.com/feeds/videos.xml?channel_id=UC39ZfoNWe5zYFD1D0hTRRsQ

Now you can paste that into any RSS reader and you’ll be able to track when new content is posted.

If you don’t see the Channel ID in the address of the channel.

  1. Go to the YouTube channel you want to track
  2. View the page’s source code
  3. Look for the following text: channel-external-id
  4. Get the value for that element (it’ll look something like UCBcRF18a7Qf58cDRy5xuWdE
  5. Replace that value into this URL:
https://www.youtube.com/feeds/videos.xml?channel_id=UCBcRF18a7Qf58cDRy5xuWdE

Now you can paste that into any RSS reader and you’ll be able to track when new content is posted.

With some channels if you go to their videos it will just show the channel name like this:

https://www.youtube.com/user/dpreviewcom/videos

Just copy and paste that in to your RSS reader, it might work and it will save you from having to dive through the page source code to find the channel ID

I use Protopage as my RSS reader and home for all my bookmarks, I monitor hundreds of channels and blogs using this site.

Sharing Flipboard Magazine Articles on Twitter Automatically

You can easily share posts on Twitter or other social media networks from within the Flipboard app. However, if you want it to share posts automatically then it is actually quite easy to do with the use of an external service.

Each magazine on Flipboard has an rss feed already. So each time you add an article to a magazine that RSS feed gets updated. The rss feed address is the web address of your magazine with .rss added on the end of it. You can test this out by putting the address with .rss on the end in to your own RSS feed reader, in my case I use Protopage.

Having an RSS feed means we can easily direct new entries to a Twitter account using a free service called IFTTT or ‘If This Then That’ You create a simple ‘recipe’ within the app/site to do what ever you want.

In this case you take the RSS feed and send it to Twitter. Within the ‘recipe’ you can add things like ‘Via Flipboard [Magazine address] or similar and also add appropriate HashTags on each tweet.

I’m assuming you already have set up an IFTTT account and that you have given IFTTT access to a Twitter account.

So log in to your IFTTT account and click on My Applets and then ‘New Applet’ and you should see the following screen.

Then click on the + This and you will go through to the Choose a service.

Click on RSS feed and you will get the ‘Choose Trigger’ screen, click on New Feed Item.

You then need to add in the address of the RSS feed of your magazine. To get the address go to: https://flipboard.com/profile, then click on your magazine so you are viewing it in the browser. Then select the address from the address field of the browser and paste it in to the Feed URL field on IFTTT, and then add .rss at the end of the address. Then click Create Trigger.

We then have to tell what IFTTT should do every time it finds a new item in your rss feed. Click on +that

In this example we are going to output the new item to Twitter, so click on Twitter in the Choose action service screen, but you could also post to a Facebook page, your blog, email or a host of other services!.

Click on Post a tweet in the Choose action screen.

Left as it is IFTTT will post a tweet with just the Title and the link to the post.

But you can add hashtags to your tweet and may be a link back to your magazine or your website. Be aware of the character limit on Twitter (280 characters) so you might need to experiment with this field. Click on Create action.

This screen lets you review the whole applet. Click Finish to finalise the applet.


You can test your applet by flipping a new article in to your magazine and then check your Twitter feed to see the result.

I’ve been using this method experimentally with a few of my magazines for a few month and it has generated a bit more traffic to the magazines as well as to the sites the articles were from, including my own blog.

Blogger/Blogspot emails

If you use Blogger/Blogspot for your blog you will have noticed that since 25 May you will not have received emails containing the comments.

Also missing are emails about comments that need moderating or emails of new posts on your blog.

This was all connected to the new GDPR regulations and permission to send emails. Even though you had put these email addresses in yourself years ago!

There is now a simple fix, starting with emailing new comments:

  1. Go to your blogger dashboard.
  2. Select Settings (it’s in a left hand menu).
  3. Select Email.
  4. In the box for comment notification email, remove all email addresses and selected “save settings” so that no email address was in the box.
  5. Then typed in your email address and hit “save settings”.
  6. You will then receive an email from blogger asking you to “subscribe” to comments on your blog.

Each emailed comment then has an unsubscribe link/option at the foot of the email, therefore they now comply with GDPR.

You can do the same trick for Comment Moderation. Comment Moderation is also in Settings in Posts, comments and sharing, Comment moderation.

Again do the same, remove the email address, save settings, put in the email address then save settings.

You will get another email asking you to confirm with a link.

‘Email posts to’ is in Settings, Email just below Comment Notification.

I hope that solves the issues for you. I have been missing getting the emails when new comments arrive on the blog!


Apple Time Machine

Do you use an Apple Mac? If you do then Time Machine is a great way of backing up your files from your machine to an external drive on a frequent basis.

So some quick tips about Time Machine:

  • Dedicate at least one external hard drive to Time Machine, don’t be tempted to use it for other files as well. It reduces the capacity. If you need an external drive for other files buy another drive.
  • Leave the drive connected all the time. If you are using a Macbook (Laptop) then an external drive that connects to your network or your router (Western Digital MyCloud) is a good alternative to one hard-wired to your machine.
  • Buy a large drive, the bigger the drive the longer Time Machine can keep backups for before it starts deleting old back ups.
  • If you buy a larger drive at a later date, it is possible to transfer your previous backups to the newdrive, see this article for details. I’ve done this a few times and it’s fairly involved but follow the steps shown and you should retain all your previous backups.

Time Machine keeps:

  • Hourly backups for the past 24 hours
  • Daily backups for the past month
  • Weekly backups for all previous months

The oldest backups are deleted when your drive becomes full.

How useful is Time Machine?

  • If your Mac has a hard drive failure and you have to replace the internal drive, when you turn the machine back on having installed OSX then the machine will offer the opportunity to restore the machine from the most recent Time Machine back up.
    • This back up will restore all your data, settings, passwords, desktop files, photos, music, in summary everything.
    • Occasionally you will find you will have to put in product codes to activate software.
  • The restore process can take a few hours, I ran mine over night the couple of times I’ve had to do this.
  • You can restore individual files, say you had a file on your desktop some weeks ago. Then you can enter Time Machine and track back and find the file again by literally going back in time. You can then restore that file. If a later version exists then you can opt to replace or keep both versions of the file, which is useful with changing files.
  • You can split your Time Machine back ups across more than one drive, Time Machine then just uses each drive in turn. This helps to increase the overall security of your back ups in the case of an external drive failure.
  • Running Time Machine will not slow down your machine, it all happens comfortably in the background and you will hardly notice it happening.

Problems with Time Machine?

Occasionally you might get an error message that says that Time Machine hasn’t been able to verify the latest back up. There seems to be very little you can do about this about from starting the process off again. Time Machine will start a new back up and delete the old one. This is a good reason for using more than one external drive for Time Machine back ups.

In my case I use a locally connected USB external drive as one Time Machine drive and a network connected MyCloud drive as the other one.

On rebooting the external drive will not always be picked up. Let me explain.

The external Time Machine drive icon is normally shown on your desktop on your Mac and it will look like this:

A normal non-Time Machine drive will look like this:


On start up or rebooting if your Time Machine drive looks likes the ‘Yellow/Orange’ drive above it might be functioning ok as your Time Machine back up drive, but just to be certain there are a few simple things you can try to ensure it turns to ‘Green’

  1. Starting with the simple test. Hover your cursor over the Finder icon on the dock (normally at the left) press the ‘Alt’ key on the keyboard then ‘Right Click’ the mouse and then left click on ‘Relaunch’ Finder will relaunch and then check to see if your drive icon has changed to ‘Green’

If it hasn’t then go to the next step.

2. Go in to System Preferences, Time Machine. Click on Add or Remove Back Up Disk and then click on your external drive again, then ‘Use Disk’

You can then close System Preferences. If the Time Machine Icon hasn’t turned ‘Green’ try relaunching Finder again using the Alt, Right Click, Relaunch routine again. It should then turn ‘Green’ and all should be working as it should.

As reboots of Macs is normally fairly infrequent, you will not be doing this that often.

Every so often you can check in Time Machine System Preferences, this is will show the latest and oldest back up dates, how much drive space you have.

If you disconnect your Time Machine drive from your computer, Time Machine will politely remind you that you haven’t backed up for n weeks with an on-screen message after about 10 days. Hence why it is always best to keep the drive connected when ever possible.

Finally.

This has been a lightning tour of what Time Machine can offer, but it really is a useful feature built-in to OSX that you should be using. External drives are not expensive these days. So get one and get using Time Machine… And remove the drive to a safe place if you are going away for any length of time.